Please contact your network technical support before proceeding with this installation.
NOTE:
| • | Users must be part of domain users or have network access to the Terminal Server (their local PC must be part of the same network the terminal server is on) for synchronisation to work. |
| • | Make sure you check the Minimum Specifications for both your Desktop Computer and Mobile Device before installing. |
Installing ADLInspect on a Terminal Server
1. |
Connect to the Internet and proceed to the ADL Software web site (www.adlsoftware.com), and click on <Download Now> under the ADLInspect section
Select your state if prompted
|
2. |
Choose the appropriate download option then click on the Download link
|
3. |
Install ADLInspect_Setup.exe using the normal steps for adding software on a terminal server
|
4. |
When the installation is complete, open the ADLInspect Manager by double-clicking on the ADLInspect Icon on your desktop
If you are prompted that Active Sync is not installed and you are currently opening the ADLInspect Manager on a Terminal Server then click <Yes>
|
5. |
The very first time you run either the ADLInspect Manager or the ADLInspect Dictionary Manager a dialog box will appear asking you to enter a Username and Password. The values you enter will then be used to create an Administrator Account within the ADLInspect System. You will need to remember these values as you will use them to login to the ADLInspect System each time
Note: The Username and Password is user defined and not supplied by ADL Software
|
6. |
Once logged in, ignore the welcome wizard by clicking <Skip Wizard>
|
7. |
Every person that requires use of the ADLInspect System should now be setup with a separate Username and Password
For help editing Users refer to User Setup
|
8. |
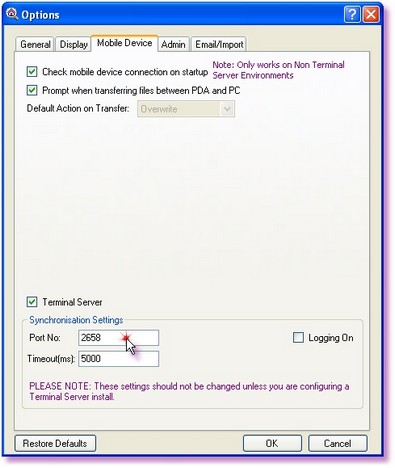
Once all the Users have been setup you will need to make sure the communication port between the Mobile Device and the ADLInspect Manager is open
The default port is 2658. If you need to change the 'Port No.' you can do this by going into the 'Options' screen via the 'Tools' menu in the ADLInspect Manager and clicking on the 'Mobile Device' tab
|
9. |
Once the port has been setup, close the ADLInspect Manager
|
10. |
Now locate the ADLInspect folder on your computer or network, where the program was installed, by using My Computer (usually found as a link on Desktop) or Windows Explorer (usually found in the Start menu, in Programs and under Accessories)
By default the program is installed to C:\Program Files\ADL Software\ADLInspect
|
11. |
Copy the following files and folders to a location on the local workstation or onto a flash drive;
ADLInspectInstaller.exe ADLInspectMobileInstaller.ico OpenNETCF.Desktop.Communication.dll SetupADLInspect folder SetupNETCFv2 folder
|
12. |
Collect all the Mobile Devices from the users, that require the installation of ADLInspect, and physically go to a workstation in the office with Active Sync installed (min. version 4.2) and plug in the Mobile Device
|
13. |
When Active Sync has connected, run the 'ADLInspectInstaller.exe' file you copied from the ADLInspect folder
|
14. |
Run through the installation wizard
|
15. |
Once ADLInspect has been successfully installed on the Mobile Device, open the ADLInspect program on the Device
To access ADLInspect from your Mobile Device, select 'Programs' from the 'Start' menu and then select 'ADLInspect'
|
16. |
When the program loads a prompt should appear saying there is No Profile Selected
You will need to create a profile on the Mobile Device
|
17. |
To create a profile, open the 'Settings' screen from within the 'Options' menu and click on the 'User Settings' tab
|
18. |
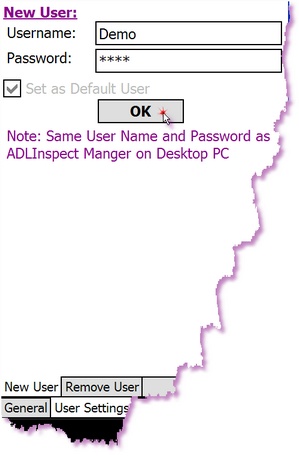
Make sure you are in the 'New User' tab and enter the Username and Password for the appropriate user
Note: The Username and Password needs to be identical to the user created in the ADLInspect Manager on the Terminal Server
|
19. |
Tick the 'Set as Default User' and click <OK>
When prompted to switch to the current user click <Yes>
|
20. |
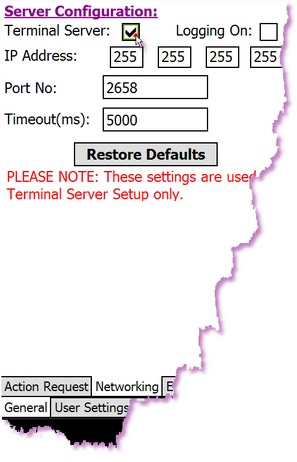
Once you have created the user(s) on the Device, you will need to setup the networking so that the Mobile Device can find the Terminal Server
Within the 'Settings' screen select the 'General' tab and then the 'Networking' tab
|
21. |
Tick the 'Terminal Server' check box
|
22. |
Enter the 'IP Address' of the Terminal Server and the 'Port No.' used
|
23. |
Once you have entered the appropriate information close the 'Settings' window by clicking on the <OK> button in the top right-hand corner
ADLInspect will return to the main menu and refresh
|
24. |
Click on the <OK> button in the top right-hand corner again to close the program
|
25. |
Repeat Steps 13 to 24 to setup addition Mobile Devices to run ADLInspect |

Testing/Using ADLInspect on a Terminal Server
1. |
Connect the Mobile Device to the Desktop PC
|
2. |
Open ADLInspect on the Mobile Device, by selecting 'Programs' from the 'Start' menu and then selecting 'ADLInspect'
|
3. |
Click on the <Sync> button
|
4. |
Remotely login to the Terminal Server
|
5. |
Open the ADLInspect Manager and login using the same user as the one on the Mobile Device
|
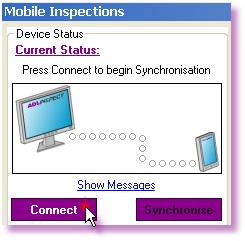
6. |
Click on the <Connect> button within the 'Device Status' section of the ADLInspect Manager
|
7. |
Click on the <Connect> button in ADLInspect on the Mobile Device
|
8. |
The Manager and the Mobile Device will synchronise
Once both the Manager and the Mobile Device have successfully sychronised (both 'Status' animations will have solid green lights) you can then send and retrieve inspections to and from the Device
Note: The user can not use ADLInspect when connected to the Desktop Computer, unlike the workstation version. When synchronised the user can send and retrieve inspections to and from the Device using the ADLInspect Manager. When done click <Disconnect> on the Mobile Device and only then can you use ADLInspect on the Device
|
9. |
To disconnect, click the <Disconnect> button on the Mobile Device
|